Showing posts with label Green Food. Show all posts

My favorite Dark Chocolate Mint Cupcake Recipe


Several years ago, I hosted a Chocolate Mint Party in honor of National Chocolate Mint Day, and this is the recipe that I used. I wanted to share it with you because it's my favorite recipe to use when I'm using fresh chopped mint from my garden.

National Chocolate Mint Day is celebrated annually on February 19th, but chocolate mint desserts are enjoyed all throughout the year! What better way to enjoy the flavor of mint than by baking up some sweet chocolate mint cupcakes.
............................................................★☆★............................................................

Dark Chocolate Mint  Cupcakes

  • 2 cups walnuts, toasted, cooled
  • 1 cup whole-milk ricotta cheese
  • 1/4 cup chopped fresh mint
  • 2 tablespoons honey
  • 1 cup all purpose flour
  • 1/2 teaspoon baking powder
  • 6 ounces bittersweet (not unsweetened) or semisweet chocolate, chopped
  • 3/4 cup (1 1/2 sticks) unsalted butter, cut into 1/2-inch cubes
  • 1 1/4 cups sugar
  • 3 large eggs
  • 1 teaspoon vanilla extract

White Chocolate Mint Frosting
1/2 cup whipping cream
1 tablespoon unsalted butter
8 ounces high-quality white chocolate, chopped
1 tablespoon green crème de menthe

Preparation

For cupcakes:
Preheat oven to 325°F. Butter two 12-cup mini-muffin pans. Using on/off turns, blend first 4 ingredients in processor until walnuts are finely chopped. Whisk flour and baking powder in small bowl. Stir chocolate and butter in heavy small saucepan over low heat until melted and smooth. Cool slightly.

Using electric mixer, beat sugar, eggs, and vanilla in large bowl until very thick, about 4 minutes. Gradually beat in cooled chocolate mixture. Stir in walnut mixture. Spoon 1 1/2 tablespoons batter into each prepared muffin cup.

Bake cupcakes until tester inserted into center comes out clean, about 15 minutes. Cool in pan on rack. Cut around cupcakes to loosen; turn out onto work surface. (Can be made 1 day ahead. Cover; store at room temperature.)

White Chocolate Mint Frosting:
Bring cream and butter to simmer in heavy small saucepan over medium heat, stirring until butter melts. Remove from heat. Add white chocolate; stir until melted. Mix in crème de menthe. Transfer frosting to bowl; let frosting cool at room temperature until firm enough to pipe, stirring occasionally, about 2 hours.

Spoon frosting into pastry bag fitted with medium star tip. Pipe frosting decoratively atop cupcakes.
.............................................................★☆★............................................................

My Closing Thoughts~
  • I make these cupcakes in Spring Summer and Fall, when my mint is growing so perfuse all over the place.
  • I also like to make these cupcakes at Halloween. The colors just go great on a Halloween decorated table. Once I created a Frankenstein table where all the food and drinks were either black or green. This cupcake was a hit on the table that night.
  • I also made this cupcake for a small garden party I went to. All the guests brought something that was made with something from their herb garden.
  • Happy Chocolate Mint Day. ~ "Live everyday like a Holiday" Pam
.............................................................★☆★............................................................
This article is licensed under the GNU Free Documentation License. It uses some material from wikipedia /article chocolatemint©/and other related pages.  Photo:flickr.com/26396724@N05/  / gone-ta-pott / epicurious.com
.............................................................★☆★............................................................

Let's make some Wild Green Garlic Butter / Recipe for you


Today I wanted to talk about Wild Green Garlic Butter

It's the Season to make it! Spring and early summer is the most popular time to forage for wild garlic leaves that you can chop up and make special butter for those special occasions. All you have to do is mix it, mold it and freeze it until that special holiday rolls around then pull it out of the freezer and put in the refrigerator. 

I can always find it growing wild in my yard, and I mow it over with the lawnmower along with the other wild onions, so I bet you have it in the wilds of your yard too. Wild green garlic butter is so easy to make and tastes delicious served over seafood, fish, steamed veggies and over grilled meats. Also remember it when your making fresh baked onion bread and potato dishes. Oh, and it's nice as an additive over a bowl of seasoned noodles. Just let it melt and stir. The bright green color is just beautiful When it's strawberry season... it's wild green garlic butter season too. Wink~ Here let me share with you how I make mine. 🠟

.............................................................★☆★............................................................

  • 8 ounces / Unsalted Butter at room temperature
  • 1 ounce / Chopped wild garlic leaves
  • 1 tablespoon / Extra Virgin Olive Oil
  • 1 tablespoon / Freshly squeezed lemon juice
  • 1 teaspoon / Flakey Sea salt
  • 1 teaspoon / Sugar
  • 1/2 teaspoon / Black Pepper

  1. Mix the room temperature butter, sugar, salt and pepper together first.
  2. Then olive oil and lemon juice / mix
  3. Then add chopped up wild garlic / mix
  4. Form butter in a plastic tub / just like when you buy a tub of butter / then refrigerate it or freeze it.
.............................................................★☆★............................................................

Allium canadense: It goes by several other common names

Allium canadense, the Canada onionCanadian garlicwild garlicmeadow garlic and wild onion is a perennial plant native to eastern North America from Texas to Florida to New Brunswick to Montana. The species is also cultivated in other regions as an ornamental and as a garden culinary herb.

Five varieties of the species are widely recognized

The Canada onion is cultivated as a vegetable in home gardens. It was formerly collected from the wild to be eaten by Native Americans and by European settlers. People in the Cherokee Nation continue the tradition of picking and cooking wild onions in early spring. Various Native American tribes also used the plant for other purposes: for example, rubbing the plant on the body for protection from insect, lizard, scorpion, and tarantula bites. "Yesss that's what I read!"

The whole plant can be eaten raw, with the tougher outer layers removed. It can also be cooked and included in any recipe calling for onions. The species has an onion odor; if this is lacking, it may be that the poisonous deathcamas has been collected instead of A. canadense.

.............................................................★☆★............................................................


My Closing Thoughts~

  • I hope this was a fun post for you. I think anytime we can make herb butter in any form is a good thing because herbs add so much flavor to everything and are so good for you. Try replacing the 1 ounce of wild garlic with any other herbs that you have. It's hard to mess butter up so go for it.
  • I have more herbed butter recipes. If you like I can share a few more recipes. Every now and then I go off on an herb butter kick when my herb garden is looking full, and I try all kinds of combination butters. hehee~
  • Here's another tip: replace the butter with cream cheese. Ok, so that's not a butter but it sure is good on toasted bread, crackers and potatoes! What can I say...
  • If you need a special gift for a food lover this would be great to give! Just freeze the tub first (to help keep it from melting) then give with some homemade bread. YUM
  • Hummm... since you're thinking about butter right now.... I also shared a post about "Basting Butter Sauces" - thought you might like that post too.
  • I also think it's a good idea for everyone to get to know their yard and see what it has to offer. Sometimes we're so busy in life that we don't even realize our feet are trampling all over something special.
"Live everyday like a Holiday" Pam

.......................................................★☆★......................................................

HOLIDAYS TO REMEMBER
πŸ“… Herb Day / Celebrated the 1st Saturday in May
πŸ“… November 17 / National Butter Day
.............................................................★☆★............................................................

πŸ›’ Butter / https://amzn.to/3R5oW83
πŸ›’ Cream Sauce / https://amzn.to/3ymZ3cp
πŸ›’ Butter Sauce / https://amzn.to/3QNLCcJ
.............................................................★☆★............................................................
This article is licensed under the GNU Free Documentation License. It uses some material from wikipedia
Wave.video /  gone-ta-pott /

Matcha White Chocolate Macadamia Nut Brownie Recipe


I searched the Internet for recipes for matcha brownies...

and I found a few recipes to play with. I picked out 3 recipes and baked all 3 to see which one I liked the most and to be honest.... they all tasted the same even though the recipes were different. The only difference was the texture. One recipe called for butter the other did not. One was gooey one was not, and one was to dry. So.... I took the middle road and leveled up the amounts to match my taste buds for the day and baked a 4th batch of matcha brownies that fit my likings. lol

It's a good thing I had a party I was supplying brownies for, or I would of ate all of these. Especially since they had white chocolate and macadamia nuts in them. I have a weakness for white chocolate and macadamia nuts in anything when baked together.

Now I know someone is going to ask me what matcha is ~

Matcha is finely ground powder of specially grown and processed green tea leaves. That's why the powder is green, and you can find it in all the grocery stores.  πŸ›’ Matcha Powder / https://amzn.to/3yhqcgN

.......................................................★☆★......................................................

Recipe: Matcha White Chocolate Macadamia Nut Brownies

Ingredients

  • 1 1/2 cup all-purpose flour
  • 2/3 cup salted butter melted
  • 2 eggs
  • 1 1/2 to 2 tbsp Matcha Powder
  • 1 cup sugar
  • 1 tsp baking powder
  • 3/4 cup white chocolate chips
  • 1/4 cup chopped macadamia nuts
  • 1 T water if needed / or extra butter

Instructions

  • Preheat oven to 325 degrees / Melt butter / let cool.
  • In a bowl, beat the sugar, butter and eggs together. In another bowl, sift together flour, baking powder and matcha powder.
  • Mix the dry and wet ingredient together. Mix in the white chocolate chips and macadamia nuts to taste / adjust quantity
  • Put the mixture in a baking pan well-greased or lined with parchment paper. Bake for 25 minutes, or until fully cooked. 
  • Let brownie cool for 10 minutes then cut and serve.
.......................................................★☆★......................................................

Closing thoughts ~

If you're the food party type and enjoy hosting those ALL-green food parties, then keep green brownies in mind. Also serve them for any of the holidays below. 🠟

"Live Everyday like a Holiday". Pam

.......................................................★☆★......................................................

HOLIDAYS TO REMEMBER
πŸ“… Herb Day / Celebrated the 1st Saturday in May
πŸ“… December 8 / National Brownie Day
πŸ“… May 2 / National Matcha Day
......................................................★☆★......................................................

πŸ›’ ❤ Matcha Powder / https://amzn.to/3yhqcgN
πŸ›’ ❤ White Chocolate Chips / https://amzn.to/3A6HTkD
πŸ›’ Macadamia Nuts / https://amzn.to/3ngfZLm
.............................................................★☆★............................................................

Recipe for Green Goddess Dressing & Avocado Green Goddess


 A Blast from the Past Recipe that's still Great Today!

Today I'm talking about Green Goddess Dressing. Friends I really have to share this out to everyone because this is a fantastic recipe to have, especially if you have an herb garden. Many years ago, before ranch dressing took over the world... "Ha"... green goddess was one of the most popular salad dressings on the West Coast of the United States. This homemade dressing was on everyone's Sunday table. But then ranch dressing took over and the popularity of green goddess went away. 

Now for me it's still on my dinner table especially during the garden season when my herb garden has a full bounty of green goodness. And wow, talk about a great raw vegetable dip it makes! If you've never heard of it keep reading because I just know you're going to want to add it to your favorite recipes. For a party it is fantastic!  So today guys I wanted to share the definition, the recipe and a few fun facts about "Green Goddess Dressing" so here we go!

Definition:

Green goddess is a salad dressing, typically containing mayonnaise, sour cream, chervil, chives, anchovy, tarragon, lemon juice, and pepper. 

History

The dressing is named for its tint. The most accepted theory regarding its origins point to the Palace Hotel in San Francisco in 1923 when the hotel's executive chef at the time (Philip Roemer) wanted something to pay tribute to actor George Arliss and his hit play. The Green Goddess. He then concocted this dressing which like the play, became a hit. This dressing is a variation of a dressing originated in France by a Chef to Louis XIII who made a Sauce Au Vert (Green Sauce) which was traditionally served with 'Green Eel'.

In the early 1970s, salad dressing maker Seven Seas produced a bottled version of this dressing. It is still made in limited quantities, although the company has since been purchased by Kraft Foods. It is sold at online outlets, and I've bought it at Wal-Mart too. Green goddess dressing is an ingredient in several crab-based salad recipes, including that for the well-known Crab Louis.

Current

Now once upon a time, Trader Joe's made a version called simply Goddess Dressing, which was made with tahini and was beige in color rather than green. Annie's Naturals, a maker of natural salad dressings and sauces, made 2 similar versions, an ovo-lacto-vegetarian variant called Organic Green Goddess Dressing, as well as a vegan version similar to the original called Goddess Dressing. But that was my memory from years ago so I'm not sure if it's still made now. Like the Trader Joe's product, the Annie's Naturals Goddess Dressing was also made with tahini.

Example: Green Goddess Recipe

• 1/2 c mayonnaise
• 2 tbsp. chopped chives
• 2 tbsp. chopped parsley
• 1 tbsp. lemon juice
• 1/2 tsp. Worcestershire sauce
• 1/4 tsp. dry mustard
• 1/4 tsp. finely chopped garlic
Combine all ingredients and mix thoroughly.
Makes 1/2 cup.

Example: Avocado Green Goddess
• 1 med. avocado, ripe & soft
• 1/2 c. chopped fresh chives
• 1 clove garlic
• 1/4 c. fresh chopped parsley
• 1 tbsp. dried tarragon
• 2 c. mayonnaise
• 1/4 c. tarragon vinegar
• 1 tbsp. lemon juice

Prepare at least 3 hours before serving.
Mash avocado until creamy and set aside.
Add garlic, parsley, tarragon, chives, vinegar, lemon juice and mayonnaise. Mix well until creamy. Refrigerate until using. You can use onions instead of chives, not as delicate though. You can use for vegetable dip or on lettuce as a salad.
.......................................................★☆★......................................................

Closing words to my readers ~

πŸ’‘Friends, when I make my Green Goddess, I mostly use whatever herbs are looking good in my garden at the time so my amounts of each herb changes and also the type of herb changes. I have to tell you it always turns out great even if my amounts are different from the recipe. No fail for me.

I hope this post was helpful and inspiring. For those of you who have followed my posts over the many years may recognize the subject of today's post. I posted the recipe for Green Goddess in an old website that I once had about 10 years ago. It's good to be reminded of a good thing. Yes, a true blast from the past~

πŸ“Έ If you ever want a close look at the picture I posted, just click the photo. It will expand in a large view window for a closer look. Then click the area you want to look even closer at and it will usually expand just that part of the photo too. πŸ˜€

πŸ“… And as always, I've listed related πŸ“… calendar dates below 🠟, and any related shopping links πŸ›’ that would be helpful to this article. 

 It's so important to "Live everyday like a holiday." I hope you do that. Love Pam

.......................................................★☆★......................................................

πŸ“… May / National Salad Month
πŸ“… October 17 / Green Day
.......................................................★☆★......................................................

► πŸ›’ ❤ Green Goddess Dressing / https://amzn.to/3aUlOLN
► πŸ›’ ❤ Salad Gifts / https://amzn.to/3ty7kHX
.............................................................★☆★............................................................

Munch for Lunch / Green Beans, ham, potatoes, onion and cornbread


 Yesterday I shared a clip of my green beans cooking... 

and I talked about fresh green beans. Today I wanted to share pictures of my "Munch for Lunch", my green bean complete meal so you could see the whole plate. This meal was my Super Sunday Supper and the left overs because my "Munch for Lunch." LOL

Now I want to share a link with you. 

I actually filmed a video of this meal being cooked if you would like to go and watch me make it. I made the whole meal in 1 pot. Yep, a true 1 pot meal. https://www.youtube.com/watch?v=tRWAeDioN1w&t=45s


Photo angles

I took several angles of the same plate so you could get a good look of my "Munch for Lunch" I call this recipe my "Sweet Heat Green Beans." Why? Because it's sweet from a tad bit of honey and it has heat because of the peppers.


You can tell this meal has everything you need for a complete meal. 

It has ham for the meat, it has healthy green beans, it has onion for a vegetable and it has beautiful brown bottom potatoes and last but not least... for the bread, I made southern cornbread.


Browning the potatoes

Now if you watch the video you will be able to see how I was able to brown the potatoes for a 1 pot meal. The key is cooking the meal in a flat pan. That way you can slice the potatoes in half, then press the flat side of the potato in the bottom of the pan.


Cornbread to taste

Anytime I cook ham and beans I always want soft on the inside and really crispy cornbread on the outside for my bread. Now since my beans have a hint of sweetness to it, because of the honey... I choose to cook a savory cornbread instead of a sweet cornbread.


Butter on the bread

I don't know about you, but my mouth says I need lot's of real white butter on my cornbread. You can see from this picture that the cornbread was still hot and had started slightly melting the butter and it was soaking into the cornbread. Yummmm!

I really enjoyed this Southern Meal!

I have to tell you that this meal was very satisfying when it came to taste.  The grease in the ham seasoned the beans and potatoes just perfect and allowed the potatoes to brown even in a pan that had water in it. It was also satisfying from it's beautiful colors.  It had a beautiful circle of different food colors all around the plate that would be a nice visual effect if you had dinner guests.

In Closing...

Thank you for being with me today as I shared my "Munch for Lunch." Remember that anytime you visit this website you will be able to find my latest Munch for Lunch in the right hand sidebar under the title " Popular Topics" then you will see "Munch for Lunch." Just click it and it will take you to my latest lunch post.

If you want to see my latest "Super Sunday Supper".... same directions. Right hand sidebar, except it's under "Weekly Fun", then "Super Sunday Supper" ~Wink~  Love, Pam

My Fresh Green Beans are Cooking


 Ohhhh ya'll! 

There's nothing like fresh green beans from green bean plants I promise you. Now this year I planted Blue Lake Bush type green beans and not the vine type. Doesn't matter which one you plant they are both very tasty. Anyway... what you see simmering in the pot is green and yellow bush beans both. You also see fresh herbs, onions and seasoning. Tomorrow I will post more pictures of the 1 pot meal that I cooked with these beans. So keep an eye out for my "Munch for Lunch" tomorrow.


Now what your looking at is the bush type blue lake green beans. 

These are the plants that I picked my beans from that you see simmering in the pot. I could of planted these in the ground but I hate to pick beans from the ground. LOL~ I like them planted in a tall flower pot so I don't have to kill my back when I'm picking beans. If you've ever picked beans you will know what I mean. With green beans you just about have to use both hands to pop them off so you don't break the limbs. You can also plant the vine variety. 


Here's the mess of beans I picked for the meal.

 It was plenty for a big pan full. I snapped off the ends, washed them, then added to the pan.

That's my post for today

❤  I hope you enjoyed watching my simmering beans today. I loved the sound of the simmering water didn't you. LOL~ I just want to encourage everyone to be thankful for the little things in life. Something as simple as a small green bean bush is special. Especially when it provides you enough of beans for a full bowl and a full meal. So thankful! Remember, something as simple as watching simmering beans cook is relaxing. That's a blessing too ya know.  Don't take anything for granted. 

❤  Remember to watch my "Munch for Lunch". I will have it ready for you by tomorrow. Love Pam

It's Creme de menthe Day!


Since it's National Cream de menthe day I was surfing the web looking for something to make in honor of the day and this is what I found. Look at that picture! Don't it just make your mouth water? My cookie monster of a husband is going to love these! If you try this recipe let me know how they turn out.


Mint Chocolate Chip Cookies Recipe

INGREDIENTS:

1 pouch (1 lb 1.5 oz) Betty Crocker® sugar cookie mix
1/2 cup butter or margarine, softened
1/4 to 1/2 teaspoon mint extract
6 to 8 drops green food color
1 egg
1 cup creme de menthe baking chips
1 cup semisweet chocolate chunks

DIRECTIONS:

1. Heat oven to 350°F. In large bowl, stir cookie mix, butter, extract, food color and egg until soft dough forms. Stir in creme de menthe baking chips and chocolate chunks.

2. Using small cookie scoop or teaspoon, drop dough 2 inches apart on ungreased cookie sheet.

3. Bake 8 to 10 minutes or until set. Cool 3 minutes; remove from cookie sheet to wire rack. Serve warm or cool completely. Store tightly covered at room temperature.

This is a great recipe for St. Patrick's Day too don't you think-

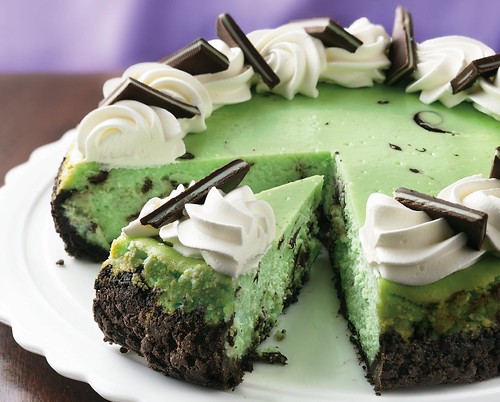
Recipe: Chocolate Grasshopper Cheesecake

Recipe: Chocolate Grasshopper Cheesecake
Celebrate National Chocolate Mint Day, St. Patrick's Day or any green theme party with this beautiful and tasty cheesecake by Pillsbury.

Let's Talk About It:
I'm thinking this is what I want to eat for National Chocolate Mint Day which is celebrated every February 19th. I really like the idea of using chocolate Creme de menthe candy to top the whipped cream. It really sets off the cheesecake with it's double stripe and gives it a great tongue tingling balance. Well that's what I think anyway.

Recipe: Chocolate Grasshopper Cheesecake
INGREDIENTS
Crust
  • 30 fudge mint cookies, crushed (about 1 3/4 cups)
  • 2 tablespoons butter or margarine, melted
Filling
  • 4 oz semisweet baking chocolate
  • 3 packages (8 oz each) cream cheese, softened
  • 1 cup sugar
  • 4 eggs
  • 1/3 cup green crΓ¨me de menthe liqueur*
  • Topping and Garnish, if desired
  • Sweetened whipped cream
  • CrΓ¨me de menthe thin rectangular candies for garnish, unwrapped, cut in half diagonally

DIRECTIONS
1. Heat oven to 300°F. Wrap foil around bottom and side of ungreased 9-inch springform pan. In large bowl, mix crust ingredients with fork until crumbly. Press in bottom and 1 inch up side of pan. Bake 12 minutes. Cool 30 minutes.
2. In small microwavable bowl, microwave chocolate on High 45 to 60 seconds, stirring once halfway through microwaving, until melted. If necessary, continue to microwave on High in 15-second increments, stirring until smooth. Set aside.
3. In large bowl, beat cream cheese and sugar with electric mixer on medium speed, scraping bowl frequently, until smooth and creamy. Add eggs, one at a time, beating until smooth after each addition. Stir in liqueur. Pour filling evenly over crust.
4. Drop 8 to 10 tablespoonfuls melted chocolate randomly onto filling, allowing chocolate to sink into filling. With table knife or small spatula, cut through chocolate and filling to swirl for marbled design.
5. Bake 1 hour 10 minutes to 1 hour 20 minutes or until set 2 inches from edge of pan. Remove from oven; run knife around side of cheesecake to loosen. Return to oven; turn oven off and open door slightly. Cool cheesecake in oven 1 hour. Remove from oven to cooling rack; cool at room temperature 1 hour. Refrigerate 3 hours.
6. To serve, remove side of pan. Spoon whipped cream into decorating bag with large star tip; squeeze bag to pipe cream around top edge of cheesecake. Garnish with candies.

*One teaspoon peppermint extract and 4 to 6 drops green food color can be substituted for the crème de menthe liqueur.
High Altitude (3500-6500 ft): Before heating oven, place small baking pan filled with 1 to 2 cups water on oven rack below cheesecake to help prevent cheesecake from cracking. Bake 1 hour 25 minutes to 1 hour 30 minutes.
High Altitude (3500-6500 ft):
Before heating oven, place small baking pan filled with 1 to 2 cups water on oven rack below cheesecake to help prevent cheesecake from cracking. Bake 1 hour 25 minutes to 1 hour 30 minutes.