Showing posts with label dessert. Show all posts

Shortbread Cookie Biscuit Recipe


Friends I'm making this post for you today to give you another option when it comes to making strawberry shortcake. Now our calendar says National Strawberry Shortcake Day is celebrated every July 14th and that's the day everybody eats that cold dessert of strawberries and whipped cream and sweet fluffy biscuits. But today I wanted to remind everyone that shortbread can also be used in creating a strawberry shortcake dessert too. Below๐Ÿ Ÿ I will be listing a simple shortbread recipe for you. Also remember this recipe for National Shortbread Day which is celebrated every January 6. 

About this recipe

"Shortbread is a type of cookie which is traditionally made from one-part white sugar, two parts butter, and three parts plain white flour, although other ingredients like ground rice or cornstarch are sometimes added to alter the texture. Shortbread is so named because of its crumbly texture (from an old meaning of the word short). The cause of this texture is its high fat content, provided by the butter. The related word "shortening" refers to any fat that may be added to produce a short (crumbly) texture."

Ingredients
  • 1.5 cups (180 g) all-purpose flour
  • 1/4 tsp salt
  • 1 cup (225 g) butter
  • 1/2 cup (115 g) sugar

Procedure
  • Cream the butter with the sugar until light and fluffy.
  • Sift the flour and salt into the mixture and work into the fat and sugar until completely amalgamated.
  • Shape the dough into a ball and roll out to about ½ inch thick.
  • Cut into squares or rectangles and prick the tops with a fork in two parallel lines.
  • Bake at 275ยบF/135ยบC for 30 to 40 minutes or until the shortbread is lightly browned.
  • Leave them on a cake rack to cool.
  • Store in a cool place in an airtight container

.............................................................★☆★............................................................

My Closing Thoughts~
  • Friends if you want the original recipe for strawberry shortcake here's the link. I posted it around July 4th because that's a traditional recipe for the 4th of July and I wanted everyone to have it for those who were hosting a traditional celebration for the 4th.
  • Also... I didn't add the crushed nuts in the recipe that you see on the outside of the shortbread. If you want nuts on it, you just add them on top before you put them in the oven to bake.
  • "Live everyday like a Holiday" Pam
.............................................................★☆★............................................................

Pavlova Recipe


 Pavlova is a popular dish and an important part of the national cuisine of both Australia & New Zealand and is frequently served during celebratory or holiday meals such as Christmas dinner.

"Pavlova is a light and fluffy meringue-based dessert named after the Russian ballet dancer Anna Pavlova. Both Wellington, New Zealand and Perth, Australia claim to be the home of the dish. The earliest record of the recipe is a cookbook published in New Zealand in 1933, two years before claims made in Perth." ???

"Pavlova is traditionally decorated with fresh fruit and whipped cream. Factory-made pavlovas can be purchased at supermarkets in those countries and decorated as desired." The photo above is a homemade pavlova decorated with pomegranate arils and Chantilly cream.

A popular tried and true recipe:
  • 3 egg whites
  • 3 tablespoons water
  • 250g (9 oz.) caster sugar
  • pinch of salt
  • 5 ml or 1 tsp vinegar
  • 5 ml or 1 tsp. vanilla extract
  • 1 tsp. cornstarch (optional)
  1. Beat the egg whites and salt to a very stiff consistency. Add water and beat again before folding in caster sugar, vanilla and vinegar. Beat until the mixture holds its shape and stands in sharp peaks.

  2. Pour the mixture onto a baking sheet lined with parchment paper. Slow-bake the mixture at 150°C (300°F) to dry all the moisture and create the meringue, approximately 45 minutes. This leaves the outside of the pavlova a crisp crunchy shell, while the interior remains soft and moist.

  3. A top tip (but not traditional) is to turn the pavlova upside down before decorating with cream and fruit because the bottom is less crispy than the top after cooking and unless you serve it immediately after decorating the "top" absorbs moisture from the cream. Another tip is to leave the pavlova in the oven after turning off the heat - this helps to prevent the middle of the pavlova from collapsing (although if it does collapse, generous application of cream can hide any mistakes!)

Preparation and consumption
"Pavlova is made by beating egg whites (and sometimes salt) to a very stiff consistency before folding in caster sugar, white vinegar, cornstarch, and sometimes vanilla, and slow-baking the mixture to create the meringue. This makes the outside of the pavlova a crisp crunchy shell, while the interior remains soft and moist. The pavlova's internal consistency is thus completely different from that normally associated with meringue, having more of a soft marshmallow texture."

"Pavlova is traditionally decorated with a topping of whipped cream and fresh fruit of sweet/tart flavors, such as strawberries and kiwifruit, or passionfruit and banana or berries and peach slices. Raspberry is a popular topping in the United Kingdom, with the tartness of raspberries contrasting with the sweetness of sugar. Factory-made pavlovas can be purchased at supermarkets and decorated as desired. A commercial product is available that includes pre-mixed ingredients for baking the meringue shell, requiring only the addition of water and sugar."

My Closing Thoughts!

Being American I was not familiar with pavlova but what a treat it was when a true Australian made it for me. Now I know what pavlova is.
"Live everyday like a holiday" Pam
......................................................★☆★......................................................

This article is licensed under the GNU Free Documentation License. It uses some material from wikipedia / gone-ta-pott

Matcha White Chocolate Macadamia Nut Brownie Recipe


I searched the Internet for recipes for matcha brownies...

and I found a few recipes to play with. I picked out 3 recipes and baked all 3 to see which one I liked the most and to be honest.... they all tasted the same even though the recipes were different. The only difference was the texture. One recipe called for butter the other did not. One was gooey one was not, and one was to dry. So.... I took the middle road and leveled up the amounts to match my taste buds for the day and baked a 4th batch of matcha brownies that fit my likings. lol

It's a good thing I had a party I was supplying brownies for, or I would of ate all of these. Especially since they had white chocolate and macadamia nuts in them. I have a weakness for white chocolate and macadamia nuts in anything when baked together.

Now I know someone is going to ask me what matcha is ~

Matcha is finely ground powder of specially grown and processed green tea leaves. That's why the powder is green, and you can find it in all the grocery stores.  ๐Ÿ›’ Matcha Powder / https://amzn.to/3yhqcgN

.......................................................★☆★......................................................

Recipe: Matcha White Chocolate Macadamia Nut Brownies

Ingredients

  • 1 1/2 cup all-purpose flour
  • 2/3 cup salted butter melted
  • 2 eggs
  • 1 1/2 to 2 tbsp Matcha Powder
  • 1 cup sugar
  • 1 tsp baking powder
  • 3/4 cup white chocolate chips
  • 1/4 cup chopped macadamia nuts
  • 1 T water if needed / or extra butter

Instructions

  • Preheat oven to 325 degrees / Melt butter / let cool.
  • In a bowl, beat the sugar, butter and eggs together. In another bowl, sift together flour, baking powder and matcha powder.
  • Mix the dry and wet ingredient together. Mix in the white chocolate chips and macadamia nuts to taste / adjust quantity
  • Put the mixture in a baking pan well-greased or lined with parchment paper. Bake for 25 minutes, or until fully cooked. 
  • Let brownie cool for 10 minutes then cut and serve.
.......................................................★☆★......................................................

Closing thoughts ~

If you're the food party type and enjoy hosting those ALL-green food parties, then keep green brownies in mind. Also serve them for any of the holidays below. ๐Ÿ Ÿ

"Live Everyday like a Holiday". Pam

.......................................................★☆★......................................................

HOLIDAYS TO REMEMBER
๐Ÿ“… Herb Day / Celebrated the 1st Saturday in May
๐Ÿ“… December 8 / National Brownie Day
๐Ÿ“… May 2 / National Matcha Day
......................................................★☆★......................................................

๐Ÿ›’ ❤ Matcha Powder / https://amzn.to/3yhqcgN
๐Ÿ›’ ❤ White Chocolate Chips / https://amzn.to/3A6HTkD
๐Ÿ›’ Macadamia Nuts / https://amzn.to/3ngfZLm
.............................................................★☆★............................................................

Recipe for 4 Layer Delight Dessert


๐Ÿ’– Blast from the past!  You have to make this one!

The very first time I ever ate this yummy dessert was at the yearly family Christmas party as a young girl. My Daddy's side of the family would alway's get together and shared many wonderful recipes.  One year my Aunt Evelyn made this beautiful cold dessert called "Four Layer Delight" This dessert was so beautiful displayed in its glass bowl, just to look at it made your mouth water. 

๐Ÿฅฃ This Dessert has 4 layers / Recipe below:

The bottom layer was a nutty crust layer. It tasted so buttery. The 2nd layer was the sweet cream cheese layer. The 3rd layer was the chocolate pudding layer. The 4th layer was the whip cream and walnuts layer. It just screamed Holiday.


๐Ÿ‘€ Looks Great in serving dish

During the holiday's many of the dishes we choose to make are foods that not only taste great but look great in a dish.  This dessert was one of those desserts. It was so beautiful in her glass dish and caught my eye immediately. You could see all 4 layers of the creamy goodness and I just couldn't resist being the 1st person to spoon out the 1st serving of its chocolate sweetness.


๐Ÿ‘ฉ  The Best part is...
 
Aunt Evelyn was happy to share the recipe and I've made it ever since. This recipe is not just perfect for a major holiday like Christmas but it's perfect as a cold dessert on a hot summer night too. Simple ingredients, you can't go wrong with it.

๐Ÿ˜‹ This dessert is packed full of nuts! 

Walnuts being my favorite.... I really layer them on, but you can use less if nuts are not your thing. During the Holidays though, heavy nuts seem to be the in thing to do. Nuts are on everything!  Smileeeeee  ~You can change up the nuts too if you want to. I've used pecans and that was good. I've even tried macadamia nuts with white chocolate pudding and that was fantastic!!
.............................................................★☆★............................................................


4 Layer Delight Recipe

1st Layer
2 cups flour
2 sticks soft butter
1 cup of nuts (your choice)
Mix flour and soft butter together and press in the bottom of a glass baking dish. Bake at 375 until lightly brown.
Let Cool

2nd Layer
8 oz. cream cheese
1 cup confectionary sugar
1 cup cool whip
Mix really good and spread on cool crust.

3rd Layer
2 small instant chocolate jello pudding
3 cups of milk
Mix together and spread on top of the cream cheese layer.

4th Layer
Spread the top with a layer of cool whip.
Top with Nuts.  My favorite nut to use with this recipe is walnuts.

Place in refrigerator and cool for 2 hours before serving.
Enjoy!


 And as always, I've listed related ๐Ÿ“… calendar dates below ๐Ÿ Ÿ, and any related shopping links ๐Ÿ›’ that would be helpful to this article. "Live everyday like a holiday." Pam
.............................................................★☆★............................................................

๐Ÿ“… February / National Chocolate Lovers Month
๐Ÿ“… October 28 / National Chocolate Day
.............................................................★☆★............................................................

► ๐Ÿ›’ ❤ Chocolate Pudding / https://amzn.to/3mtWBtV
.............................................................★☆★............................................................

Recipe for 4 Layer Delight Dessert

This beautiful chocolate dessert is a cold dessert that is made with a layer of chocolate pudding, a layer of sweet cream cheese, a layer of whipped cream, and a crust that is packed full of crushed nuts.  Yum Yum!
.....................................................................................................

Recipe: Four Layer Delight

1st Layer
2 cups flour
2 sticks soft butter
1 cup of nuts (your choice) I always use walnuts
Mix flour and soft butter together and press in the bottom of a glass baking dish. Bake at 375 until lightly brown.
Let Cool

2nd Layer
8 oz. cream cheese
1 cup confectionary sugar
1 cup cool whip
Mix really good and spread on cool crust.

3rd Layer
2 small instant chocolate jello pudding
3 cups of milk
Mix together and spread on top of the cream cheese layer.

4th Layer
Spread the top with a layer of cool whip.
Top with Nuts.  My favorite nut to use with this recipe is walnuts.

Place in refrigerator and cool for 2 hours before serving.
Enjoy!
....................................................................................................................................................


Chocolate Fondue made with the fruit brandy kirschwasser

Slices of fruit or pastry are dipped in a caquelon of melted chocolate, often flavored with rum or kirschwasser.  

This recipe is made with Kirschwasser a clear, colorless fruit brandy traditionally made from double distillation of morello cherries, a dark-colored cultivar of the sour cherry 


Dessert fondues may also be made with coconut, honey, caramel, or marshmallow. 

......................................................................................................

RECIPE
  • 6 ounces of milk chocolate (chips or roughly chopped from a block)
  • 6 ounces of dark chocolate (chips or roughly chopped from a block)
  • 1 cup (8 ounces) of heavy whipping cream
  • 1 tablespoon butter
  • A pinch of salt
  • 3 tablespoons Kirschwasser
  1. Melt both chocolate together in a double bowler with butter.
  2. Heat cream on medium heat in a separate pan with pinch of salt.
  3. Remove cream from heat / add the chocolate and mix until smooth.
  4. Add kirschwasser in last / stir until blended
  5. pore in fondue pot
  6. If fondue becomes to thick / just add a tablespoon of cream and stir.

You can also add a flavorful touch by adding either
  • cinnamon
  • flavored irish creams
  • peppermints
  • pinch of cayenne pepper

Dip with: 
  • cubed pound cake
  • sponge cake
  • angel food cake
  • strawberries
  • sliced bananas
  • apples
  • cookies
  • lady fingers
  • dried appricots
..............................................................................................................................

This post is in honor of 
"Fun with Fondue Month" which is celebrated the whole month of November.
...............................................................................................................................

10 Most Unexpectedly Delicious Desserts

There are many delicious desserts all around the world. Some we never heard of ourselves! So we thought it would be fun to do an infographic on 10 unexpectedly delicious desserts. Enjoy! Source: http://feast...-desserts/
Holidays To Remember: This post is in honor of October being National Dessert Month / October 14 National Dessert Day.
10 Most Unexpectedly Delicious Desserts!
by Zainpbs.

From Visually.

Mug Cake Recipes

Whether you fancy raspberry, chocolate or lemon cake, you’re just five minutes away from a delicious dessert; in this case the proof really is in the pudding!
Click photo to enlarge:
Mug Cake Recipes

From Visually.

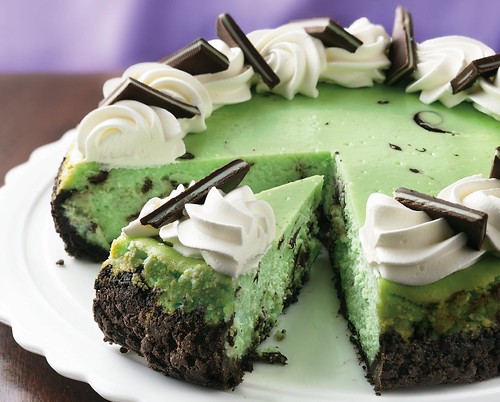
Recipe: Chocolate Grasshopper Cheesecake

Recipe: Chocolate Grasshopper Cheesecake
Celebrate National Chocolate Mint Day, St. Patrick's Day or any green theme party with this beautiful and tasty cheesecake by Pillsbury.

Let's Talk About It:
I'm thinking this is what I want to eat for National Chocolate Mint Day which is celebrated every February 19th. I really like the idea of using chocolate Creme de menthe candy to top the whipped cream. It really sets off the cheesecake with it's double stripe and gives it a great tongue tingling balance. Well that's what I think anyway.

Recipe: Chocolate Grasshopper Cheesecake
INGREDIENTS
Crust
  • 30 fudge mint cookies, crushed (about 1 3/4 cups)
  • 2 tablespoons butter or margarine, melted
Filling
  • 4 oz semisweet baking chocolate
  • 3 packages (8 oz each) cream cheese, softened
  • 1 cup sugar
  • 4 eggs
  • 1/3 cup green crรจme de menthe liqueur*
  • Topping and Garnish, if desired
  • Sweetened whipped cream
  • Crรจme de menthe thin rectangular candies for garnish, unwrapped, cut in half diagonally

DIRECTIONS
1. Heat oven to 300°F. Wrap foil around bottom and side of ungreased 9-inch springform pan. In large bowl, mix crust ingredients with fork until crumbly. Press in bottom and 1 inch up side of pan. Bake 12 minutes. Cool 30 minutes.
2. In small microwavable bowl, microwave chocolate on High 45 to 60 seconds, stirring once halfway through microwaving, until melted. If necessary, continue to microwave on High in 15-second increments, stirring until smooth. Set aside.
3. In large bowl, beat cream cheese and sugar with electric mixer on medium speed, scraping bowl frequently, until smooth and creamy. Add eggs, one at a time, beating until smooth after each addition. Stir in liqueur. Pour filling evenly over crust.
4. Drop 8 to 10 tablespoonfuls melted chocolate randomly onto filling, allowing chocolate to sink into filling. With table knife or small spatula, cut through chocolate and filling to swirl for marbled design.
5. Bake 1 hour 10 minutes to 1 hour 20 minutes or until set 2 inches from edge of pan. Remove from oven; run knife around side of cheesecake to loosen. Return to oven; turn oven off and open door slightly. Cool cheesecake in oven 1 hour. Remove from oven to cooling rack; cool at room temperature 1 hour. Refrigerate 3 hours.
6. To serve, remove side of pan. Spoon whipped cream into decorating bag with large star tip; squeeze bag to pipe cream around top edge of cheesecake. Garnish with candies.

*One teaspoon peppermint extract and 4 to 6 drops green food color can be substituted for the crรจme de menthe liqueur.
High Altitude (3500-6500 ft): Before heating oven, place small baking pan filled with 1 to 2 cups water on oven rack below cheesecake to help prevent cheesecake from cracking. Bake 1 hour 25 minutes to 1 hour 30 minutes.
High Altitude (3500-6500 ft):
Before heating oven, place small baking pan filled with 1 to 2 cups water on oven rack below cheesecake to help prevent cheesecake from cracking. Bake 1 hour 25 minutes to 1 hour 30 minutes.

Mother's Old Faithful Fresh Apple Cake


For as long as I can remember Mother always made Fresh Apple Cakes from a stack of recipes she collected over the years. I'm not really sure why she collected so many of them because it seemed she always tweaked each recipe so much that it always ended up looking like and tasting like her old faithful apple cake. giggle~  (Recipe at bottom)


Every Month she baked a cake 

You would think this apple cake was just a holiday cake but Mother made it all throughout the year. This cake is the moistest cake you will ever put in your mouth. It all because of the oil that's in the recipe. Lots and lots of oil! A whole cup of it too! Wow! Oh and the icing.... well it's a simple brown sugar icing that's just brown sugar, milk and butter that's cooked.

Mother tossed this cake together without measuring. 

Sometimes she used a whole cup of oil and sometimes she used a cup 1/4. Sometimes she added a cup of pecans and sometimes she used a cup & 1/2. It always amazed me how she just pored it all from the bottle or bag and said..... that looks ah-bout-right. LOL! When she made this cake she always grated the apples instead of chopping or dicing. She said it tastes better if you do. In my photos I wanted the readers to be able to see the apples so I just chopped them. That was a mistake. Mother was right. It tastes better with grated apples to me. I even held back on the oil with this cake but I will never do that again either. ha ha ha!

I loved to eat this cake for breakfast: 

When ever Mother knew I was coming for a visit, there would always be a fresh apple cake waiting on me. As soon as I walked in the door I knew immediately she baked it. The smell of apples, nutmeg and cinnamon would slap me in the face. Mother had a habit of hiding the cake so she could surprise me with it for breakfast the next morning. This cake was ALWAYS better the second day. I would ask "did you bake an apple cake Mother?" Noooo she would say. I would bust out laughing and go searching through the house. She would always say "I didn't bake one this time." My Mother was never good at lying. ha ha! She just couldn't do it. I would keep looking until I found it because my nose told me different. I remember one year I found it hidden in the piano stool. HA HA HA! Anyway.... I could never wait until breakfast to cut into it. I would come walking back to the kitchen with it in my arms as I watched my Mother reaching into the drawer for a knife- grinning ear to ear. Yep a Mother knows when her daughter can't wait till morning. :)

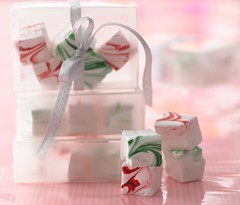
Sweet Swirl Marshmallows Recipe


Sweet Swirl Marshmallows Recipe 
Originally uploaded by Betty Crocker Recipes
I'm not sure why but I always think of marshmallows at Christmas. There must be some fond memory hiding in the back of my mind somewhere that makes me want it at Christmas. ha ha!

I've never tried making homemade marshmallows myself... though my husband has made them several times. He usually makes the traditional white or pastel color marshmallows but never made a swirl before. When I ran across this Betty Crocker recipe a light bulb went off in my head. I think I should try and make these and show up my husband. LOL! They're so much better than store bought any day.

INGREDIENTS:

  • Butter
  • 1/3 cup powdered sugar
  • 1/2 cup cold water
  • 2 1/2 tablespoons unflavored gelatin
  • 1 1/2 cups granulated sugar
  • 1 cup corn syrup
  • 1/4 teaspoon salt
  • 1/2 cup water
  • 1 teaspoon peppermint extract
  • 8 to 10 drops red or green food color


DIRECTIONS:

1. Generously grease bottom and sides of 11x7-inch (2-quart) glass baking dish with butter; sprinkle with 2 tablespoons of the powdered sugar. Pour 1/2 cup cold water into bowl of heavy-duty mixer fitted with paddle or whisk attachment. Sprinkle gelatin over water; set aside.

2. In 2-quart heavy saucepan, heat granulated sugar, corn syrup, salt and 1/2 cup water over low heat, stirring constantly, until sugar is dissolved. Increase heat to medium-low and heat syrup to boiling. Boil without stirring until syrup reaches 240°F on candy thermometer, about 15 to 20 minutes; remove from heat.

3. With mixer running at low speed, slowly pour hot syrup into gelatin mixture in thin stream down side of bowl (avoid pouring syrup onto paddle or whisk, as it may splash). Gradually increase speed to medium-high; beat until mixture is white and has almost tripled in volume, about 8 to 10 minutes. Add peppermint extract and beat to blend, about 30 seconds longer. Randomly drop four drops of red or green food color into marshmallow mixture in bowl; fold 3 to 4 times to swirl color.

4. Pour into baking dish. Smooth top with damp rubber spatula. Drop red or green food color randomly on top of marshmallow mixture. Using toothpick, pull food color through marshmallow mixture to create swirl pattern over top. Let stand uncovered at least 4 hours.

5. Sprinkle cutting board with about 1 tablespoon of the powdered sugar. Place remaining powdered sugar in small bowl. To remove marshmallow mixture, loosen sides from dish, and gently lift in one piece onto cutting board. Spray sharp knife with cooking spray. Cut marshmallows into 1-inch squares (11 rows by 7 rows). Dust bottom and sides of each marshmallow by dipping into bowl of powdered sugar. Store in airtight container at room temperature up to 3 weeks.

Meringues

Meringues are crunchy confections made from whipped egg whites and sugar. In Germany and Austria (but not in France) they are called Baiser (from French kiss). Served with whipped cream, they are a traditional dessert in the canton of Bern in Switzerland. See our meringue page for similar uses of whipped egg whites.


Meringues 9027
By Mike Lehmann, Mike Switzerland /creativecommons/licenses

Ingredients

  • whites of 4 eggs
  • 1 cup (250ml) superfine sugar powdered sugar or granulated sugar. Ideal is a mixture of 50% superfine and 50% powdered sugar.
  • 2 teaspoons of lemon juice
  • ¼ teaspoon vanilla extract, if desired


Procedure

  1. Beat whites of eggs until stiff and dry.
  2. Add lemon juice
  3. Gradually add sugar and continue beating until mixture holds shape and is very shiny. Test if the sugar is wholly solved and no grains remain (this can take longer or shorter depending on the sugar used).
  4. Add vanilla.
  5. Drop by spoonfuls on unglazed paper
  6. Bake in slow oven 80 to 90 minutes, depending on size. Use very low heat, meringues should rather dry than bake and should be dry and only very slightly colored, when finished.
  7. Let cool, before serving
  8. In the original Swiss recipe, two meringues per serving are filled with sweetened whipped cream, but the cream is often supplemented with strawberries or other fresh fruits and vanilla ice cream

Tips and Variations

  1. The tiniest bit of egg yolk or fat prevents the egg white to get stiff
  2. Meringues are more decorative if shaped with a pastry bag
  3. Another method of baking is, to preheat the oven and bake the meringues 2-3 minutes at moderately hot temperature, then turn down the oven completely and keep it shut for 8 hours.
  4. Meringues do not turn out very well, if the air is very humid (due to climate or due to steam from other cooking)
resources: wiki cookbooks

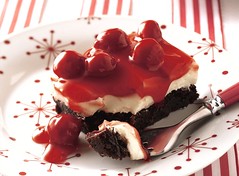
Cherry-Topped Brownie Dessert Squares

Cherry-Topped Brownie Dessert Squares 
Originally uploaded by Pillsbury.com
Like most people; during the many holidays throughout the year, I like to find as many recipes that I can- that let's me serve the colors of the observance. Colors like green for St. Patrick's Day, orange for Halloween, red for Valentines Day and red & green for Christmas.  Well these cherry topped brownies have been added to my list for red foods for sure.  This recipe has also been added to my list of brownie recipes found on the bottom of this post under "labels.

Note: This is very easy dessert to make. Also remember this recipe for National Brownie Day which is celebrated December 8th and National Cream Cheese Brownie Day too.

INGREDIENTS
  • 1 box (1 lb 2.3 oz) fudge brownie mix
  • 2/3 cup oil
  • 1/4 cup water
  • 2 eggs
  • Filling
  • 2 packages (8 oz each) cream cheese, softened
  • 1 container (1 lb) vanilla ready-to-spread frosting
  • 1 teaspoon almond extract
  • Topping
  • 1 can (21 oz) cherry pie filling, chilled


DIRECTIONS
1. Heat oven to 350°F. Grease bottom only of 13x9-inch pan with shortening. In large bowl, stir brownie ingredients until well blended with spoon. Spread in pan.
2. Bake 24 to 26 minutes or until toothpick inserted 2 inches from side of pan comes out almost clean. Cool completely, about 30 minutes.
3. In large bowl, beat filling ingredients until smooth. Spread over cooled brownies. Cover; refrigerate at least 2 hours or until set.
4. To serve, spoon pie filling over top. Cut into squares.

High Altitude (3500-6500 ft): Bake brownies following High Altitude directions on box for 13x9-inch pan.