Showing posts with label cake recipes. Show all posts

Who remembers the old Chocolate Mayonnaise Cake?


Oh my gosh! I just found an old label off a mayonnaise jar that has the recipe for the old timey Chocolate Mayonnaise Cake. I can't believe it.

From what I just read the recipe was printed on Hellman's Mayonnaise jars starting around 1937. It seems the recipe was created so you didn't have to use butter and milk since those ingredients were hard to come by during WW11. The mayonnaise was used as a replacement for those. I remember my mother baking this cake and it was super moist. This find has put a memory in my heart and a smile on my face.

My Closing Thoughts~

  • 📅 Mark your calendars ahead: Our Holiday Calendar says we have a National Chocolate Cake Day that is celebrated every January 27th. / German Chocolate Cake Day is June 11th / National Cake Day is November 26.
  • This was so fun I just had to share / Love to you all / "Live everyday like a Holiday."

.............................................................★☆★............................................................

resource: wave.video

Lemon Charlotte Cake Recipe


 Pictured is a Lemon charlotte cake with glass of wine and a bowl of strawberry set on a table overlooking the garden. This particular cake is a cold cake and sometimes called a Charlotte Russe.

This beautiful cake would be great for tea parties, outdoor garden parties and fantastic for International Cake Day which is celebrated on July 20th / National Cake Day celebrated on November 26.

.............................................................★☆★............................................................

What is a charlotte?

• A charlotte is a type of dessert that can be served hot or cold. It can also be known as an "ice-box cake". Bread, sponge cake or biscuits/cookies are used to line a mold, which is then filled with a fruit puree or custard. It can also be made using layers of breadcrumbs.

• Classically, stale bread dipped in butter was used as the lining, but sponge cake or ladyfingers may be used today. The filling may be covered with a thin layer of similarly flavored gelatin.

• Due to the simple preparation of charlottes, many different varieties have developed. Most charlottes are served cool, so they are more common in warmer seasons. For more, research Charlotte (dessert)

.............................................................★☆★............................................................

Lemon Charlotte Russe Recipe
  • 1/2 c. sugar
  • 1 (1/4 oz.) env. unflavored gelatin
  • 2 c. milk
  • 4 egg yolks
  • 1 tsp. lemon extract
  • 1 tsp. grated lemon rind
  • 4 egg whites
  • 3 lemon slices, cut in half
  • 8 ladyfingers, split
Mix sugar and gelatin in small saucepan; stir in milk. Cook over medium high heat, stirring constantly, until mixture begins to boil. Stir some of milk mixture into egg yolks; stir yolk mixture into saucepan. Cook over medium heat, stirring constantly, until mixture coats a metal spoon, 3 to 5 minutes. Stir in lemon extract and rind; cool to room temperature. Refrigerate until mixture mounds slightly, about 30 minutes.

Beat egg whites in large bowl until stiff but not dry peaks form. Stir 1/4 of the whites into milk mixture; fold milk mixture into egg whites. Line bottom of greased 1 quart Charlotte mold or souffle dish with waxed paper. Arrange lemon slices in bottom of mold. Line side of mold with ladyfingers put edges facing in. Spoon filling into mold. Refrigerate until firm, about 4 hours. Carefully loosen ladyfingers with knife; unmold on serving plate. Remove wax paper from top. Refrigerate.

.............................................................★☆★............................................................

Easy Charlotte Russe recipe

  • 1 1/4 c. milk
  • 2 egg yolks
  • Gelatin
  • 3 tbsp. sugar
  • Pinch of salt
  • Cream
  • 1 tsp. lemon
  • 1 tsp. vanilla
  • Shredded coconut
  • Cherries
Make a soft custard of these 4 ingredients (1 1/4 cups milk, 2 egg yolks, 3 tablespoons sugar and pinch of salt). Soak 1 package of gelatin in 1/4 cup of water for 5 minutes and add to above custard. Then add the stiffly beaten whites of 2 eggs and set to cool. When cool, add jar of cream beaten until stiff with 2 tablespoons sugar, 1 teaspoon of lemon and 1 teaspoon of vanilla.

Line a deep dish with sponge cake (or lady fingers). Pour in mixture. Cover with shredded coconut and cherries. Set in refrigerator to cool.

.............................................................★☆★............................................................

Refrigerated Lemon Charlotte Russe
  • 1 env. unflavored gelatin
  • 1/2 c. freshly squeezed lemon juice
  • 4 eggs, separated
  • 1 c. sugar
  • Grated rind of 1 lemon
  • 16-20 lady fingers, split
  • 1 c. heavy cream, whipped to soft peaks
1. Sprinkle gelatin over lemon juice in small bowl. Soften for 5 minutes without stirring.
2. Beat together with electric mixer yolks, 1/2 cup of the sugar in top of double boiler. Gradually beat in gelatin mixture. Cook over boiling water, stirring constantly until mixture starts to thicken and gelatin is dissolved, 6 minutes. Don't let bottom of double boiler top touch water.
3. Pour into large bowl. Add lemon rind. Chill until mixture begins to mound, 15 to 20 minutes, stirring occasionally.

4. Meanwhile, line bottom and sides of 8"x13" springform pan with lady fingers, curved side out.
5. Beat egg whites with mixer in large bowl until foamy. Gradually add remaining 1/2 cup sugar and beat until soft peaks form. Fold beaten egg whites and whipped cream into lemon gelatin mixture. Spoon onto lady finger lined pan. Cover with plastic wrap. Chill 4 hours or overnight. Carefully remove from sides of pan.
.............................................................★☆★............................................................
article is licensed under the GNU Free Documentation License. It uses some material from wikipedia/article  © /  and other related pages. / gone-ta-pott / Top photo credit:   © Pr2is | Dreamstime.com
.............................................................★☆★............................................................

Mouth Watering Black Forest Cake Recipe / Cherry Brandy Version


Black Forest Cake

Black Forest Cake was just never a cake that was at the supper table or at any of our family gatherings as a kid. It wasn't on the table during the Holiday Season at my house either. It wasn't until I became an adult, moved to Florida, married and was introduced to the delicious cake for the very first time. I remember how impressed I was when I saw the cake. The visual look of it was so enticing that I just knew it was going to be delicious; and delicious it was!  How on earth we missed this recipe growing up is beyond me!  

Thousands of different recipes for black forest cake!

Yes, that statement has to be true. I know personally that I have never made this cake the same twice. True fact. Sometimes I use can cherries sometimes I use real fresh cherries and sometimes I mix and match anything and everything I can find to make the cake. I'm not kidding either. If I find 4 different types of cherries, I'm going to make a black forest cake with 4 different kinds of cherries. Below is "1" of the versions of the cake.

Black Forest Cake / Cherry Brandy Version / Whipped Cream Version
  • 1 dark chocolate cake mix (or your own from scratch)
  • 1/4 c. kirsch (cherry brandy)
  • 1 can cherry pie filling or a can of dark black cherries
  • 16 oz. heavy whipping cream
  • 1 chocolate cool whip
  • 1/2 c. confectioners' sugar
  • Maraschino cherries, drained, optional, for garnish
  • milk chocolate curls or shavings, for garnish

PREPARATION:
Drain cherry pie filling in a colander to remove most of the thickened juices.
Bake cake, as directed, in two 9-inch layer cake pans.  When cool, sprinkle kirsch cherry brandy over both cake layers.

Chill electric beaters and large mixing bowl; beat cream until it thickens slightly, gradually add confectioners' sugar and beat until thick enough to hold its shape.  Now if you don't want to go to all the trouble of making the real whipped cream like this...... then use the cheaters method and buy yourself the new Chocolate Cool Whip.  It's delicious for this cake.

Using a vegetable peeler, shave chocolate; refrigerate until ready to serve.

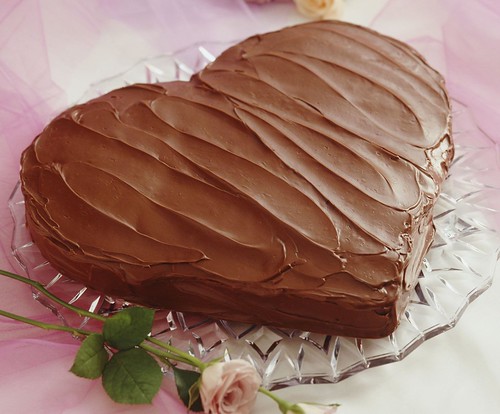
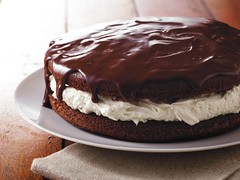
Assemble cake; place one layer on serving plate and spread its top with 1/2-inch-thick layer of whipped cream and strew the cherries over the cream.  Set other layer on top of cherries and spread top and sides of cake with remaining cream.  With fingers, gently press chocolate curls into cream on sides of cake if you want or just leave it a stacked look like in the photo above.

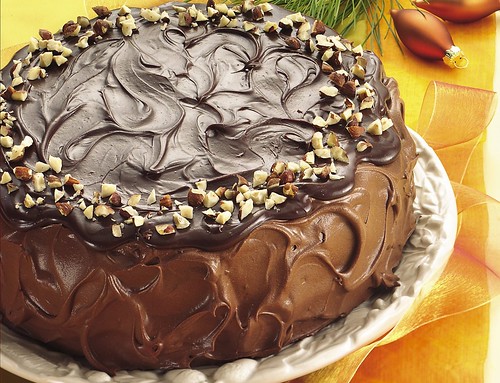
For me personally..... I love soft yummy chocolate pored on top just like the photo above. I also like to top the cake with all the different types of cherries I can find. Be it red cherries, dark cherries, black cherries, small cherries, or fat cherries. And I have to say it... I'm a chocolate curl nut so I shave chocolate curls so I can sprinkle them around on the top too. Is that over kill? Yes I think it's over the top but I love it. How do you love it?
_______________________________________________


Black Forest Cake Definitions & Facts
  • Black Forest gateau (also commonly called Black Forest cake in Canada, the USA and Australia) is the English name for the southern German dessert Schwarzwälder Kirschtorte (literally "Black Forest cherry cake").
  • It is a popular dessert throughout Germany, Austria and the world.  Typically, Black Forest gateau consists of several layers of chocolate cake, with whipped cream and cherries between each layer. These layers are topped with additional whipped cream, maraschino cherries, and chocolate shavings.
  • In some European traditions sour cherries are used both between the layers and for decorating the top.
  • Traditionally, Kirschwasser is added to the cake, although other liquors are also used (rum is common in Austrian recipes).
  • In the USA, Black Forest gateau is most often prepared without alcohol.
  • In Germany, only the traditional recipes with Kirschwasser are widespread, and other variants are very rare.
  • The confectioner Josef Keller claims to have invented Schwarzwälder Kirschtorte in its present form in 1915.
  • Schwarzwälder Kirschtorte was first mentioned in writing in 1934.

Find more definitions at: wikipedia.org
_______________________________________________

Closing Thoughts ~

It tastes so light. I know that sounds shocking to say but I guess it's because of the whipped cream center. Some recipes call for a chocolate pudding layer. I think creams and puddings will tone down the extreme sugar taste and the fruit will too. Love love love cherries! There are sooooo many versions of black forest cake now.

Ohhh and... don't skip the cherry brandy! What a difference it makes.

....................................................★☆★......................................................

🠟 Please Fill Free to Share 🠟 "Live Everyday like a Holiday" Pam

Black Forest Cake Recipe


I picked this video out in honor of National Black Forest Cake Day which is celebrated every March 28th. This is one beautiful cake and always makes my list of favorite tasting cakes too. So..... go shopping and bake this cake!


Christmas Crunch Cake Recipe


This fun granola, no bake cake is not only great for Christmas.... but would be great as any type of celebration cake. Remember this recipe for National Cake Day too!
....................................................................................................

Mug Cake Recipes

Whether you fancy raspberry, chocolate or lemon cake, you’re just five minutes away from a delicious dessert; in this case the proof really is in the pudding!
Click photo to enlarge:
Mug Cake Recipes

From Visually.

Chocolate Blackout Cake Recipe

Yesterday I posted a list of National Cake Holidays and said today I would post the recipe for a yummy Chocolate Blackout Cake. A cake that I thought would be perfect for National Chocolate Cake Day which is celebrated every January 26.

Yesterday I also gave a bit of Blackout cake information to get ya'll ready for today's post ha ha ha! I talked about how the cake was sometimes called a Brooklyn Blackout Cake. This is one dark chocolate cake and is made with a cup of brewed coffee too. Man oh man my daddy would of loved this cake. Happy Baking everyone. Recipe Below.


Originally published as Brooklyn Blackout Cake in Taste of Home recipes Across America 2013, p102 / see website
..........................................................................................................................................................................................

INGREDIENTS

  • PUDDING:
  • 1/2 cup sugar
  • 2 tablespoons cornstarch
  • 1/4 teaspoon salt
  • 1-1/2 cups whole milk
  • 3 ounces semisweet chocolate, chopped
  • 1 teaspoon vanilla extract
  • CAKE:
  • 1-1/2 cups all-purpose flour
  • 2 teaspoons baking powder
  • 1/2 teaspoon baking soda
  • 1/2 teaspoon salt
  • 1/2 cup unsalted butter, cubed
  • 3/4 cup Dutch-processed cocoa
  • 1 cup sugar
  • 1 cup packed brown sugar
  • 1 cup buttermilk
  • 1 cup strong brewed coffee 
  • 1 teaspoon vanilla extract
  • 2 large eggs
  • FROSTING:
  • 8 ounces semisweet chocolate, chopped
  • 1/2 cup unsalted butter, cubed
  • 1/3 cup hot water
  • 2 teaspoons light corn syrup

DIRECTIONS
  1. In a small heavy saucepan, mix sugar, cornstarch and salt. Whisk in milk. Cook and stir over medium heat until thickened and bubbly. Reduce heat to low; cook and stir 2 minutes longer. Stir in chocolate until melted. Transfer to a bowl; stir in vanilla. Cool slightly, stirring occasionally. Press plastic wrap onto surface of pudding. Refrigerate, covered, 2 hours or until cold.
  2. Preheat oven to 325°. Line bottoms of two greased 8-in. round baking pans with parchment paper; grease paper. In a small bowl, whisk flour, baking powder, baking soda and salt. In a large saucepan, melt butter over medium heat. Add cocoa; cook and stir until blended. Stir in sugars. Remove from heat; stir in buttermilk, coffee and vanilla. Whisk in eggs, one at a time, until blended. Stir in flour mixture just until combined.
  3. Transfer batter to prepared pans. Bake 35-40 minutes or until toothpick inserted in center comes out clean. Cool in pans 10 minutes before removing to wire racks; remove paper. Cool completely.\
  4. For frosting, in the top of a double boiler or a metal bowl over hot water, melt chocolate and butter; stir until smooth. Remove from heat. Whisk in hot water, all at once. Whisk in corn syrup and vanilla. Refrigerate 25-30 minutes or just until spreadable.
  5. Using a long serrated knife, cut each cake horizontally in half. Place a cake layer on a serving plate. Spread with half of the pudding. Repeat layers. Top with a third cake layer. Spread frosting over top and sides of cake.
  6. Crumble remaining cake layer; sprinkle over top and sides of cake, pressing lightly to adhere. Refrigerate leftovers. Yield: 12 servings.

RECIPE: Mocha-Hazelnut Cream-Filled Cake

RECIPE: Mocha-Hazelnut Cream-Filled Cake
Perfect for National Chocolate Cake Day which is celebrated every January 27th!

I wanted to pass on this Pillsbury photo & recipe because as far as a chocolate cake goes... you can't get any better than this. I say this because I enjoy the flavor of hazelnut mixed with chocolate & this recipe uses a whole 16oz. bottle of hazelnut coffee creamer. It also has a 8oz. pack of cream cheese & those who know me well know I cook lots with cream cheese.  Last but not least, nuts & chocolate just go together & this recipe has a touch of chopped hazelnuts too.


RECIPE: Mocha-Hazelnut Cream-Filled Cake

INGREDIENTS
  • 1 box (18.25 oz) butter recipe chocolate cake mix
  • Butter
  • Water
  • Eggs
  • 2 teaspoons instant coffee granules or crystals
  • 2 bags (12 oz each) semisweet chocolate chips
  • 1 bottle (16 oz) refrigerated hazelnut-flavor coffee creamer
  • 1 package (8 oz) cream cheese, softened
  • 2 tablespoons chopped hazelnuts (filberts)

DIRECTIONS
1. Heat oven to 350°F. Grease bottoms only of two 9-inch round pans. Prepare cake mix as directed on box using butter, water and eggs and adding coffee granules; pour batter into pans. Bake as directed on box. Cool 10 minutes; remove from pans and place on wire racks.
2. In 3-quart saucepan, cook chocolate chips and coffee creamer over medium-low heat about 8 minutes, stirring constantly, until melted. Remove from heat; beat in cream cheese with wire whisk until smooth. Cover; refrigerate about 30 minutes.
3. In small microwavable bowl, reserve 1/2 cup of the chocolate mixture; set aside for topping. Beat remaining mixture on medium-high speed 8 minutes or until it forms a light and fluffy frosting.
4. Place 1 cake layer on serving plate, rounded side down. Spread 1-inch-thick layer of frosting over cake. Top with second cake layer, rounded side up. Spread frosting on side and top of cake.
5. Microwave reserved 1/2 cup chocolate mixture on High 30 seconds or until soft; spread over top of cake. Sprinkle hazelnuts around top edge. Cover loosely; refrigerate at least 1 hour before serving. Store in refrigerator.
..................................................................................................................................................
1st blog post on 1/27/12 - Flickr photo /
re-post on 1/25/18

Chocolate Sweetheart Cake Recipe

Chocolate Sweetheart Cake Recipe

123Greetings says February 9 is CHOCOLATE DAY? And it's the week of Valentine's so I'm posting this Chocolate Sweetheart Cake by pillsbury not really because of it's recipe but because it explains how to make a heart shape cake without using a heart shape cake pan. Something this simple needs to be shared and you would be surprised at how many people have emailed me asking for links to directions. :)  Pass it on to new bakers!

Chocolate Sweetheart Cake Recipe

INGREDIENTS:
  • 1 package ( 1 pound 2.25 ounces) devil's food cake mix with pudding
  • 1 1/3 cups water
  • 1/2 cup vegetable oil
  • 3 eggs
  • 1 tub (12 ounces) chocolate whipped frosting or 1 tub (16 ounces) chocolate ready-to-spread frosting
DIRECTIONS:
1. Heat oven to 350°. Grease bottom only of 1 round pan, 8x1 1/2 inches, and 1 square pan, 8x8x2 inches, with shortening. Make cake mix as directed on package, using water, oil and eggs. Pour into pans.

2. Bake 30 to 35 minutes or until toothpick inserted in center comes out clean. Cool 10 minutes. Run knife around sides of pans to loosen cakes; remove from pans to wire rack. Cool completely, about 1 hour.

3. Cut round layer in half as shown in "diagram". Freeze uncovered about 1 hour for easier frosting if desired. Arrange pieces on serving platter to form heart as shown in diagram. Frost cake with frosting, attaching pieces with small amount of frosting. Store loosely covered at room temperature.
For a truly special presentation to make hearts flutter, garnish with fresh small strawberries or raspberries and curls of white chocolate. Or for real chocolate lovers, press miniature chocolate chips onto the side of the frosted cake.
----------------------------------------------------------------------------------------------------------

123greetings lists February 9 as Chocolate Day so send some fun Chocolate Greetings! 
All are FREE!  www.123greetings.com/chocolateday
-----------------------------------------------------------------------------------------------------------

Frozen Chocolate Granola Cream Cake Recipe

I have to tell you January 5th is National Whipped Cream Day and since I love whipped cream so much I knew I couldn't miss posting for this holiday. I go through at least 2 bowls of whipped cream every week. I just love it! I put in on all my dessert, in my hot cocoa and even on top of my coffee when I have it. ha ha! Here's the recipe I've picked to celebrate.

Frozen Chocolate Granola Cream Cake Recipe 
Originally uploaded by Betty Crocker Recipes
INGREDIENTS:

2 cups whipping cream
1/4 cup sugar
1 teaspoon vanilla
1 box (6 oz) Nature Valley® dark chocolate granola thins, unwrapped
1 cup Cocoa Puffs® cereal

DIRECTIONS:

1. Line 8x4-inch loaf pan with foil. In large bowl, beat cream, sugar and vanilla with electric mixer on high speed until stiff peaks form.

2. Spread 3/4 cup of the whipped cream evenly in bottom of pan. Place 3 granola thins, chocolate side up, on top of cream. Top with 3/4 cup whipped cream. Sprinkle 1/2 cup of the cereal evenly over top. Spread 3/4 cup of the whipped cream over cereal.

3. Repeat layering with 3 granola thins and 3/4 cup whipped cream. Top with remaining 1/2 cup cereal, 3/4 cup whipped cream and 3 granola thins. Cover loosely with plastic wrap. Freeze until firm, at least 4 hours or up to 2 days.

4. To serve, let cake stand at room temperature 5 minutes. Remove plastic wrap. Place serving platter upside down over pan; turn platter and pan over. Remove pan and foil. Break remaining granola thin into pieces; sprinkle over top. With sharp knife, cut crosswise into 1-inch-thick slices.

Mother's Old Faithful Fresh Apple Cake


For as long as I can remember Mother always made Fresh Apple Cakes from a stack of recipes she collected over the years. I'm not really sure why she collected so many of them because it seemed she always tweaked each recipe so much that it always ended up looking like and tasting like her old faithful apple cake. giggle~  (Recipe at bottom)


Every Month she baked a cake 

You would think this apple cake was just a holiday cake but Mother made it all throughout the year. This cake is the moistest cake you will ever put in your mouth. It all because of the oil that's in the recipe. Lots and lots of oil! A whole cup of it too! Wow! Oh and the icing.... well it's a simple brown sugar icing that's just brown sugar, milk and butter that's cooked.

Mother tossed this cake together without measuring. 

Sometimes she used a whole cup of oil and sometimes she used a cup 1/4. Sometimes she added a cup of pecans and sometimes she used a cup & 1/2. It always amazed me how she just pored it all from the bottle or bag and said..... that looks ah-bout-right. LOL! When she made this cake she always grated the apples instead of chopping or dicing. She said it tastes better if you do. In my photos I wanted the readers to be able to see the apples so I just chopped them. That was a mistake. Mother was right. It tastes better with grated apples to me. I even held back on the oil with this cake but I will never do that again either. ha ha ha!

I loved to eat this cake for breakfast: 

When ever Mother knew I was coming for a visit, there would always be a fresh apple cake waiting on me. As soon as I walked in the door I knew immediately she baked it. The smell of apples, nutmeg and cinnamon would slap me in the face. Mother had a habit of hiding the cake so she could surprise me with it for breakfast the next morning. This cake was ALWAYS better the second day. I would ask "did you bake an apple cake Mother?" Noooo she would say. I would bust out laughing and go searching through the house. She would always say "I didn't bake one this time." My Mother was never good at lying. ha ha! She just couldn't do it. I would keep looking until I found it because my nose told me different. I remember one year I found it hidden in the piano stool. HA HA HA! Anyway.... I could never wait until breakfast to cut into it. I would come walking back to the kitchen with it in my arms as I watched my Mother reaching into the drawer for a knife- grinning ear to ear. Yep a Mother knows when her daughter can't wait till morning. :)

Peanut Butter-Toffee Cheesecake Brownies

Peanut Butter-Toffee Cheesecake Brownies 
Originally uploaded by Pillsbury.com
Serve this recipe December 8th in honor of National Brownie Day. Serve in November for Peanut Butter Lovers Month. February for Chocolate lovers Month and the 3rd week in March for American Chocolate Week.

INGREDIENTS

  • 1 box (19.5 oz) Pillsbury® Chocolate Fudge Brownie Mix
  • 1/2 cup Crisco® Pure Vegetable Oil
  • 1/4 cup water
  • 2 EGGLAND’S BEST eggs
  • 1 package (8 oz) cream cheese, softened
  • 1 can (14 oz) Eagle Brand® Sweetened Condensed Milk
  • 1/2 cup Jif® Creamy Peanut Butter
  • 1 bag (8 oz) Heath® milk chocolate toffee bits
  • 1 cup Hershey's® milk chocolate baking chips
  • 3 tablespoons whipping cream

DIRECTIONS
1. Heat oven to 350°F. Lightly spray 13x9-inch pan with Crisco® Original No-Stick Cooking Spray.
2. In medium bowl, stir brownie mix, oil, water and eggs 50 strokes with spoon. Spread batter in pan; set aside.
3. In large bowl, beat cream cheese with electric mixer on medium speed until fluffy. Add milk and peanut butter; beat until smooth. Stir in 1 cup of the toffee bits. Spoon mixture over batter; spread evenly.
4. Bake 30 to 40 minutes or until cheesecake layer is set and edges are light golden brown. Cool on cooling rack 30 minutes. Refrigerate 40 minutes.
5. In small microwavable bowl, microwave chocolate chips and cream uncovered on High 40 to 60 seconds or until chips are melted; stir until smooth. Spread over cheesecake layer. Sprinkle with remaining toffee bits. Cool completely, about 1 hour. For brownies, cut into 6 rows by 6 rows. Store covered in refrigerator.

Giant Ganache-Topped Whoopie Pie Recipe


Giant Ganache-Topped Whoopie Pie Recipe
Originally uploaded by Betty Crocker Recipes
Today is National Cake Day and thanks to Betty Crocker I wanted to pass on this recipe that has the best tasting marshmallow filling in the world! I mean really.... who doesn't love whoopie pies so who wouldn't devour a whoopie pie cake. Yummie for sure. 

I use the filling recipe for many other baking projects too. Think about it for cupcake. It's so white it makes beautiful bridal showers, or winter tea party cupcakes. I like it for the snow when I make my marshmallow snowman cupcakes. Happy Cake Day everyone. Celebrate this holiday every November 26th. Oh and... you might want to remember it for chocolate holidays too.

INGREDIENTS:

Cake:
  • 1/2 box Betty Crocker® SuperMoist® devil's food cake mix (about 1 2/3 cups)
  • 1/2 cup water
  • 1/4 cup vegetable oil
  • 2 eggs

Filling:
  • 3/4 cup butter or margarine, softened
  • 1 jar (7 oz) marshmallow creme
  • 1 cup powdered sugar
  • 1 teaspoon vanilla

Ganache:
  • 1/2 cup whipping cream
  • 4 oz semisweet baking chocolate, chopped

DIRECTIONS:

1. Heat oven to 350°F (325°F for dark or nonstick pans). Spray bottoms and sides of two 8-inch round cake pans with baking spray with flour. In large bowl, beat cake mix, water, oil and eggs with electric mixer on low speed until moistened, then on medium speed 2 minutes, scraping bowl occasionally. Pour into pans. Bake 14 to 20 minutes or until toothpick inserted in center comes out clean. Cool 10 minutes. Remove from pans to cooling racks. Cool completely, about 1 hour.

2. In large bowl, beat filling ingredients with electric mixer on high speed until light and fluffy. On serving plate, place 1 cake layer, rounded side down. Spread filling over cake, spreading slightly over edge. Top with second layer, rounded side up.

3. In 1-quart saucepan, heat whipping cream over low heat until hot but not boiling. Remove from heat; stir in chocolate until melted. Cool about 10 minutes. Pour ganache onto top of cake; spread with spatula so it just begins to flow over edge of cake. Store loosely covered.
*If you like this you'll love the oatmeal cream pie recipe too!

Pull-Apart Coffee Cake Recipe


My brothers are coming over for coffee this morning and Pillsbury says "Refrigerated biscuits are the secret to making a scrumptiously easy coffee cake." So I'm trying this pull apart coffee cake recipe to go with the coffee. I was thinking.... as easy as this recipe looks; it's got to be a FAST dish to offer unexpected Thanksgiving visitors. Oh and Happy Bread month!

Pull-Apart Coffee Cake Recipe
Originally uploaded by Pillsbury.com
INGREDIENTS

1/4 cup sugar
1/4 cup golden or dark raisins
1/4 cup chopped walnuts, almonds or pine nuts
2 teaspoons grated lemon peel
2 tablespoons butter or margarine, melted
1 can (12 oz) Pillsbury® Golden Layers® refrigerated buttermilk or original flaky biscuits

DIRECTIONS

1.Heat oven to 375°F. Line bottom of 8- or 9-inch round cake pan with waxed paper. In large bowl, mix all ingredients except biscuits.

2.Separate dough into 10 biscuits. Cut each into quarters. Place biscuit pieces in sugar mixture; toss to coat. Arrange in single layer in waxed paper-lined pan. Sprinkle top with any remaining sugar mixture.

3.Bake 20 to 25 minutes or until deep golden brown. Run knife around side of pan to loosen. Place heatproof serving plate upside down over pan; turn plate and pan over. Remove pan and waxed paper. Cut coffee cake into wedges or pull apart. Serve warm.

High Altitude (3500-6500 ft): No change.